However, if different channels are created on a server, other members on the server can gain access to them. To manage access rights to a channel, you can lock it by either making it private or restricting certain actions such as sending messages. Here’s how to use either method.
Locking a Channel by Making it Private
Making a Discord channel private becomes hidden from other members on a server. Access to these channels will depend on server roles or admin invites. Here are the steps to follow to make a channel private. Step 1: Launch the Discord app.
To make a Discord channel private, you must either be a server administrator or have the right permissions. Step 2: By the left of your Discord app, you should see a list of servers you have access to. Click on the server hosting the channel that you need to hide.
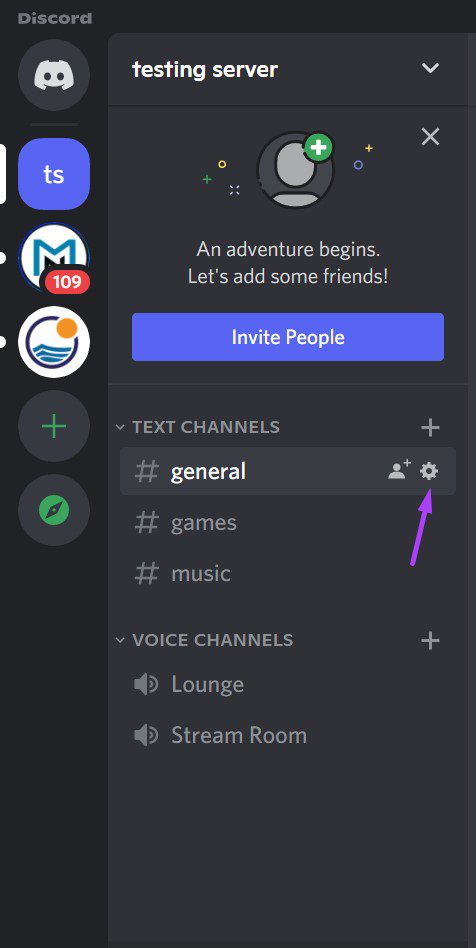
Step 3: Once the Discord server opens, you should see the different text and voice channels available. To hide the channel name, click on the Edit Channel represented by a gear icon.
To find the gear icon for a channel, you must hover your cursor over the channel name. Step 4: On the new window, click on Permissions.
Step 5: Click on the toggle beside Private Channel till a green fill shows. A green fill signifies that the private option has been enabled.
Once you enable the Private Channel toggle, only previously added channel users can see it. Also, every user that has a Server Owner or Administrator role on the server can see and make use of the channel. Step 6: To grant certain individuals access to the Private Channel, click on the Add members or roles button.
Step 7: After adding members or roles, click on Done.
Step 8: Click on Advanced permissions.
Step 9: Under Roles/Members, you will see the roles or members. Click on a role or member and under General Channel Permissions, click the x button beside View Channel to remove their access.
Step 10: Once you choose permissions, click on Save Changes which shows up as a pop-up on the page.
The process for making a channel private on Android or iPhone is similar to the one described above.
Locking a Channel by Disabling Comments
You can also disable comments instead of completely blocking the view for a particular channel. This option might be preferred if you need to create a channel for sending out announcements or rules. By disabling comments, you make the channel a Read-only channel. Here’s what you should do to disable comments only for a channel: Step 1: At the top of the window, click on the drop-down arrow beside the server’s name.
Step 2: Click on Server Settings.
Step 3: Click on Create Role to assign roles to server members.
Step 4: Go to the bottom of the window and click on Save.
Step 5: Navigate back to the server main page and click on the Gear icon beside the channel name.
Step 6: Click on Permissions and Advanced Permissions.
Step 7: Under Roles/Members, you should see the roles or members you created. Click on a role or member.
Step 8: Scroll down to Text Channel Permissions.
Step 9: Next to the Send Messages field, click the x button to prevent members from sending messages to the channel. To grant a particular member access, click their name and click the checkmark to ensure they can send messages.
Step 10: Go to the bottom of the window and click Save to apply your changes.
Appearing Offline on Discord
Now you know how to lock a Discord channel. Both methods discussed above work the same way on all devices. There is a high possibility that if you suddenly make previously public channels, private, server members might send you messages. Another alternative is you make your Discord profile appear offline.


