There are several ways in which Bluetooth can be enabled on a Windows 11 PC. Regardless of what works best for you, it is helpful to know how to operate Bluetooth settings in different ways. In this article, we will not only explain how to turn on Bluetooth on your Windows 11 PC but also show how to pair and unpair it with your Bluetooth devices. Let’s begin.
1. Enable Bluetooth on Windows 11 Using Windows Search Tool
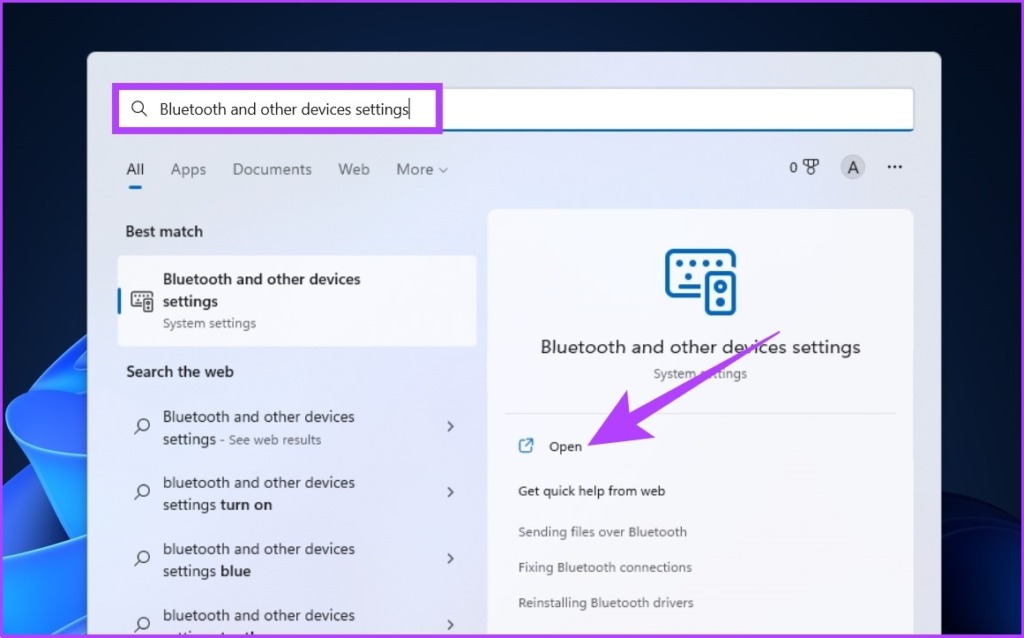
This is the easiest way to find Bluetooth settings without having to search through settings on Windows 11. Follow the steps below. Step 1: Press the Windows key on your keyboard to open the Start menu, type ’Bluetooth and other devices settings,’ and click on Open.
Step 2: Now, turn on the Bluetooth toggle.
That’s it! The Bluetooth on your Windows 11 PC is turned on. If it didn’t, check out different ways to fix Bluetooth not working in Windows 11. That said if you want to know the much easier method to turn on Bluetooth, jump to the next method.
2. Use Action Center to Turn On Bluetooth on Windows 11
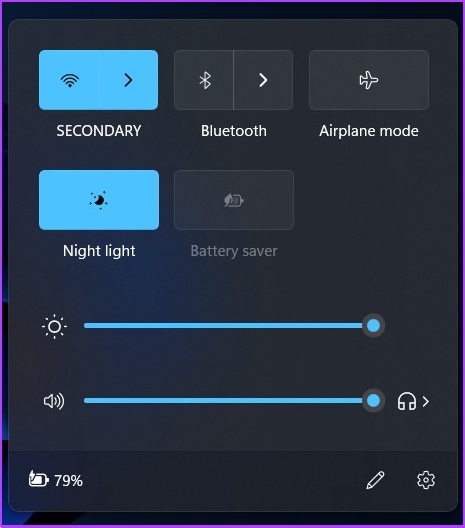
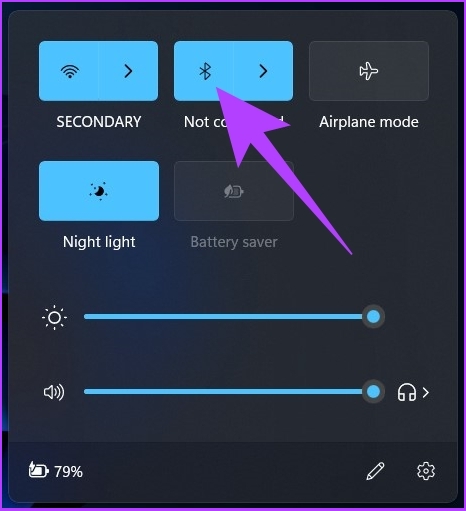
This is the most commonly used way to access Bluetooth. The Action Center is where you will find app notifications and quick actions. Follow the step-by-step guide. Step 1: Click on the Quick Settings area at the bottom right corner of the screen to open Action Center. Tip: You can also press ‘Windows key + A’ to open Action Center.
Step 2: Click on the Bluetooth icon, and it will turn on right away.
You can then pair your device without any issues. However, you can check our guide if the Bluetooth option is missing from Action Center. Well, aside from that, you can also turn on Bluetooth from Windows Settings.
3. How to Activate Bluetooth on Windows 11 Using Windows Settings
This method of turning on Windows settings is a little similar to the first method mentioned above. Step 1: Press the Windows key on your keyboard, type Settings, and press Enter. Tip: You can directly open Windows Settings by pressing ‘Windows key + I’ on your keyboard.
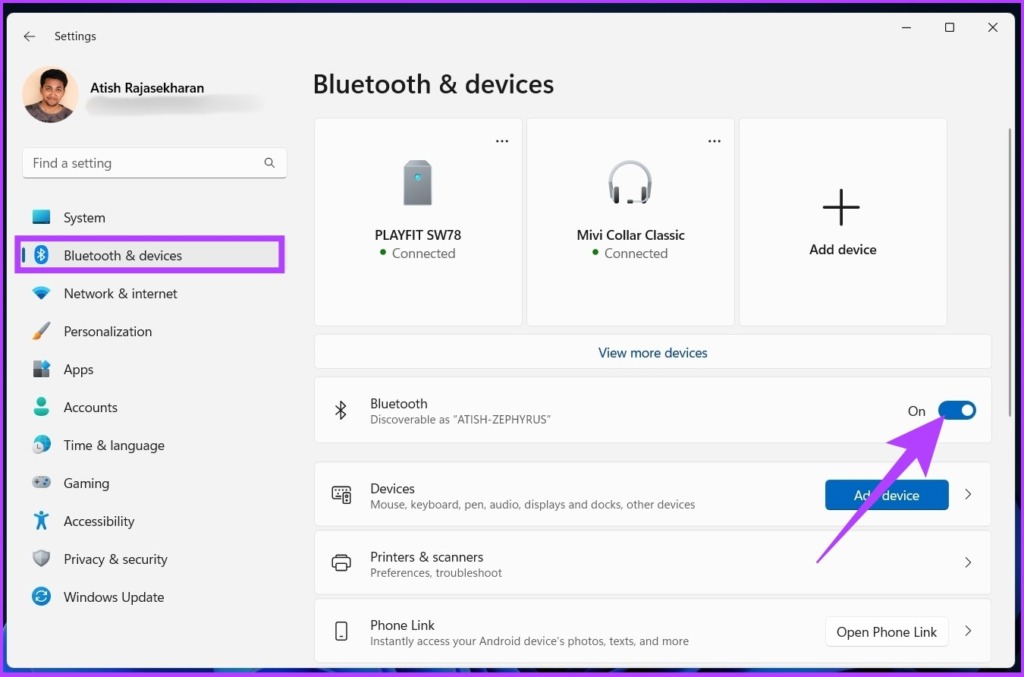
Step 2: Go to the ‘Bluetooth & Devices’ button from the left pane and turn on the Bluetooth toggle.
There you go. The Bluetooth on your Windows PC will be turned on, after which you can connect with other Bluetooth devices.
4. How to Turn on Bluetooth on Windows 11 Using Control Panel
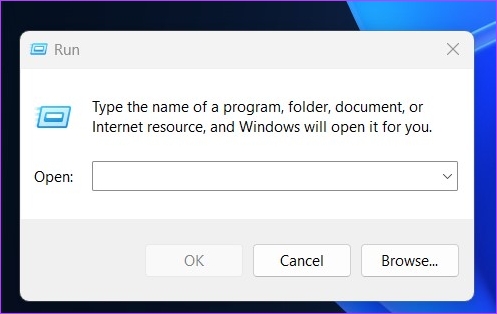
If you didn’t find Bluetooth in the Action Center or were unable to turn on Bluetooth using the above methods, chances are the Bluetooth adapter on your Windows PC is disabled. Follow the below-mentioned steps to turn it on. Step 1: Press the ‘Windows key + R’ to open the Run command.
Step 2: Enter the below-mentioned command in the text field.
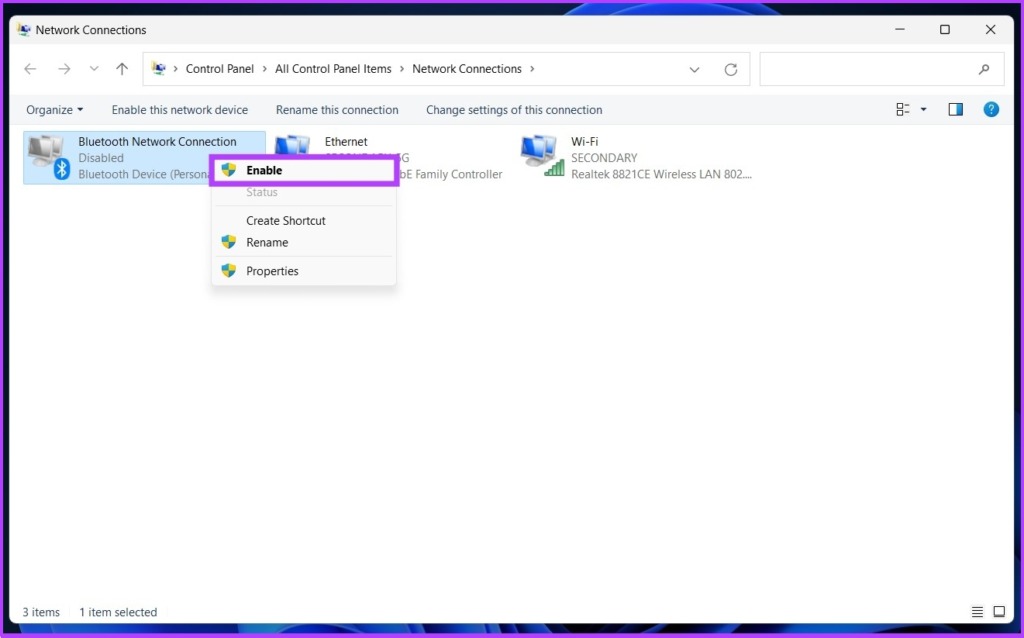
You’ll be taken directly to the Network Connections adapter settings page. Step 3: Right-click on Bluetooth Network Connection and select Enable.
This will turn the Bluetooth settings on. However, this will not turn on Bluetooth on your PC. To turn Bluetooth on, keep following. Step 4: From the Network Connections window, click on Control Panel in the address bar at the top.
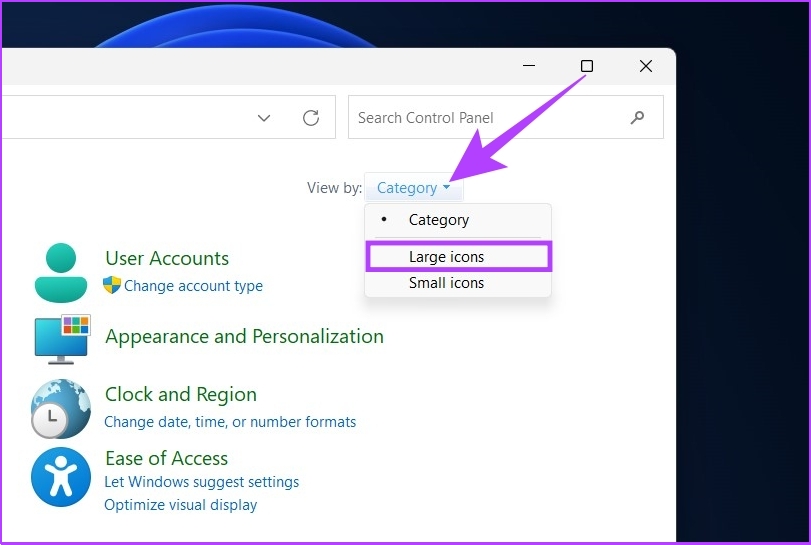
Step 5: Now, click on View by, and select Large icons from the drop-down menu.
Step 6: Navigate to Devices and Printers, right next to Device Manager.
You will land up in the Bluetooth & devices window. From here, you can directly pair a device.
5. Turn On Bluetooth on Windows 11 Using Device Manager
If the previous method did not work for you, this method will undoubtedly assist you in enabling Bluetooth on your PC. Step 1: Press the Windows key, type Device Manager, and click on Open. Tip: You can reach Device Manager using the Windows 11 command line. All you need to do is press the Windows key + R, type devmgmt.msc, and press Enter.
Step 2: In the Device Manager, double-click on Bluetooth to expand.
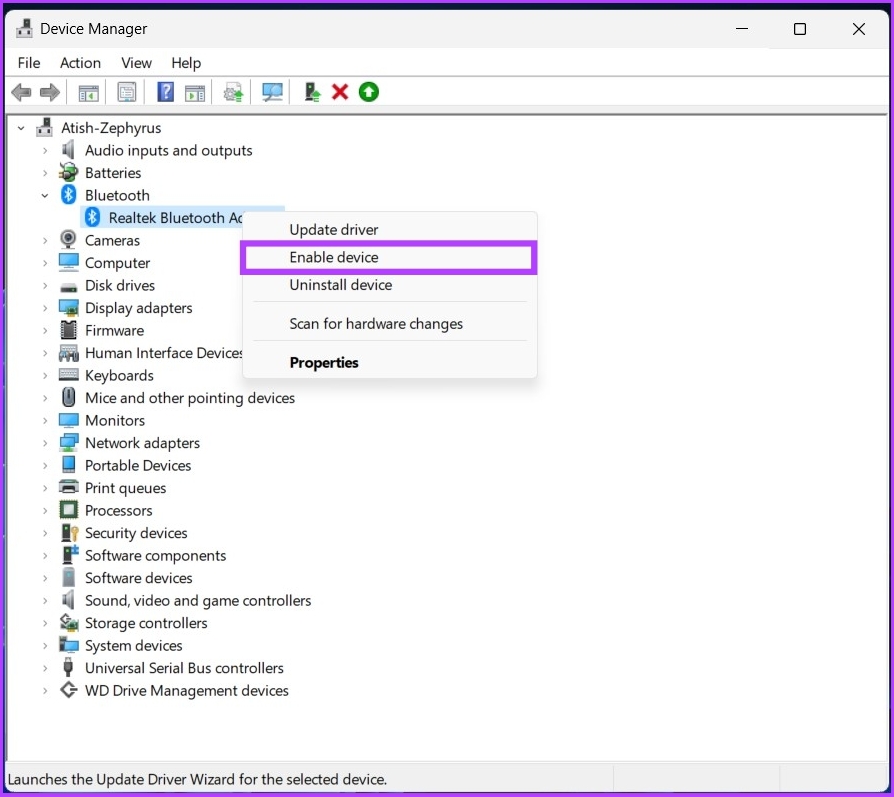
Step 3: Now, right-click on the Bluetooth adapter and select Enable device. Ex: Realtek, Broadcom, Qualcomm, etc.
Step 4: For the settings to take effect, Restart your PC.
The Bluetooth on your Windows 11 PC will be enabled, and now, you can connect your PC to the Bluetooth device. Move to the next section to learn how. Note: If you are not able to see your Bluetooth adapter, check out our guide to fix the missing Bluetooth adapter.
How to Connect a Bluetooth Device to Windows 11
Now that you know how to turn on Bluetooth on your Windows 11 PC, let’s understand how to pair a Bluetooth device with your PC. Step 1: Press the Windows key, type ‘Bluetooth and other devices settings,’ and click on Open.
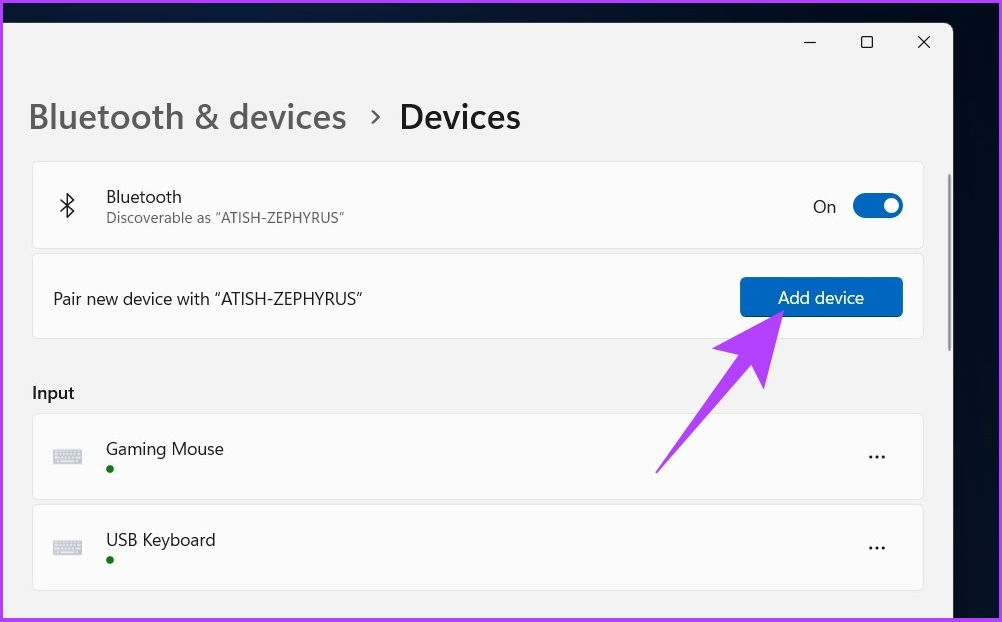
Step 2: Click on Add device to connect a new Bluetooth device.
Step 3: In the ‘Add a device’ pop-up, select Bluetooth.
Windows 11 will search for nearby Bluetooth devices to pair with. Step 4: Once you find the device to connect to, click on the name of the device.
Step 5: Your Windows 11 PC will start the pairing process, and once connected, click on Done.
Now that you know how to connect, it is fairly easy to disconnect or unpair a Bluetooth device on Windows 11 as well. Keep reading.
How to Disconnect a Bluetooth Device on Windows 11
Step 1: Press the Windows key on your keyboard, type Settings, and press Enter. Tip: You can directly open Windows Settings by pressing the Windows key + I on your keyboard.
Step 2: Go to Bluetooth & Devices from the left pane.
Step 3: Click on Devices.
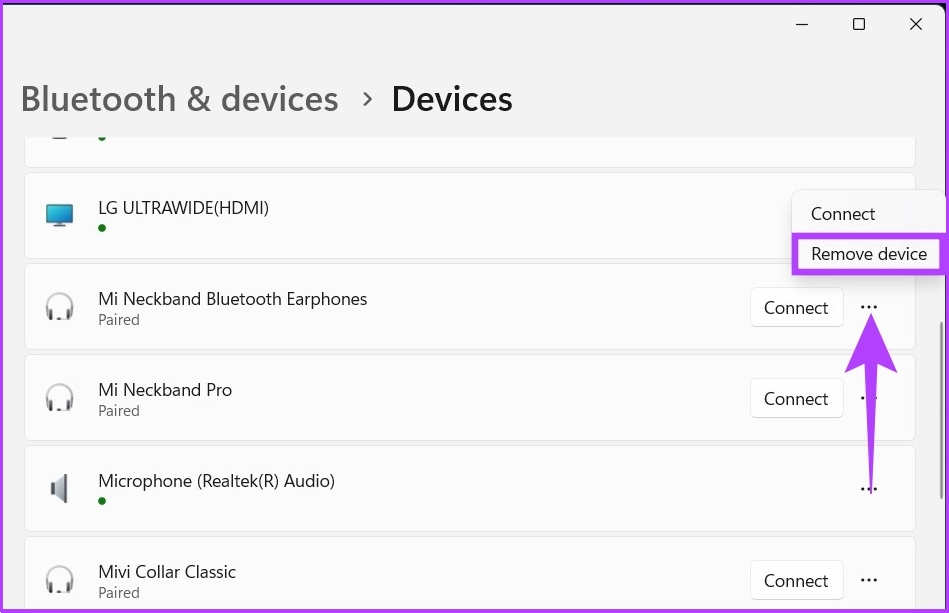
Step 4: Click on the horizontal three-dot icon next to the Bluetooth device you want to remove and select Remove device.
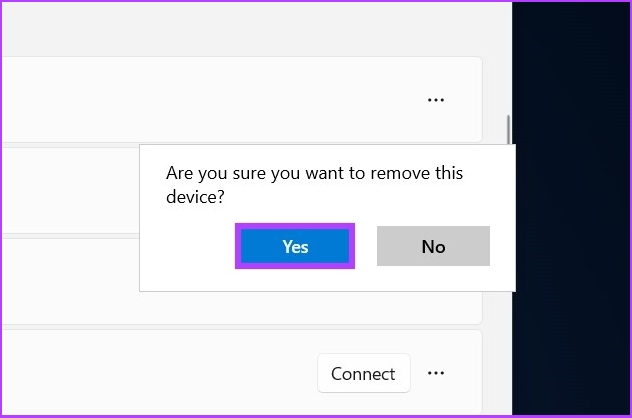
Step 4: In the prompt ‘Are you sure you want to remove this device?,’ click on Yes.
Find and Connect with Devices
The ability to quickly locate Bluetooth settings when required speeds up workflow. All of the methods described above are fairly straightforward to execute. I hope this guide helped you turn on Bluetooth on your Windows 11 system and enjoy an uninterrupted connection with Bluetooth peripherals!
