Though pretty useful, the Alt+Tab shortcut may unexpectedly stop working due to unknown reasons and force you to click between open apps on the Taskbar. We’ve compiled a list of the best fixes for situations when the Alt+Tab shortcut is not working on your Windows 11 computer.
1. Check for Keyboard Related Issues
The first thing you’ll need to check is whether there’s any issue with your keyboard. To check whether it’s a malfunctioning keyboard or software-related issue, connect the keyboard to another PC and inspect if it works as expected. If the keyboard doesn’t work, refer our guide on fixing keyboard not working on Windows 11. Alternatively, almost all Windows-compatible keyboards come with two sets of Alt keys—one on the right and one on the left. Test both of the Alt keys to check which one functions to narrow down the faulty one.
2. Check if Alt+Tab Is Properly Configured In Settings
Windows 11 doesn’t come with a toggle that you can use to enable the Alt+Tab shortcut. However, the Alt+Tab shortcut may not work as expected, especially with a multi-display setup, if it is not configured correctly in Settings. Here’s how to check if Alt+Tab is configured correctly on your Windows computer: Step 1: Press the Windows + I Keys on your keyboard to open the Settings app. Then scroll down and click on Multitasking. Step 2: On the Multitasking page, click on the Desktops drop-down. Step 3: Under Desktops section, click on the drop-down beside ‘Show all open windows when I press Aft + Tab’ and select ‘On all desktop.’ After you change the settings, you can access the Alt+Tab viewer to switch between apps on your monitors.
3. Restart the Windows Explorer
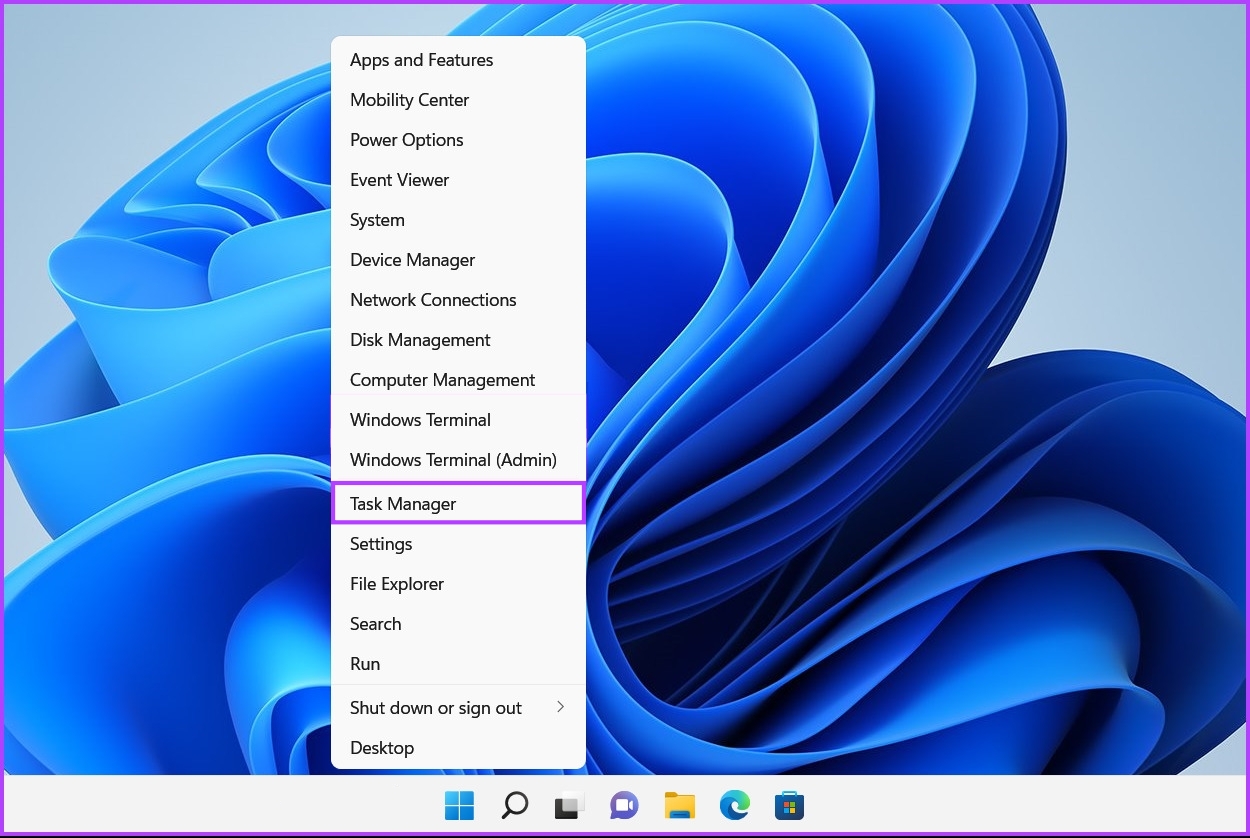
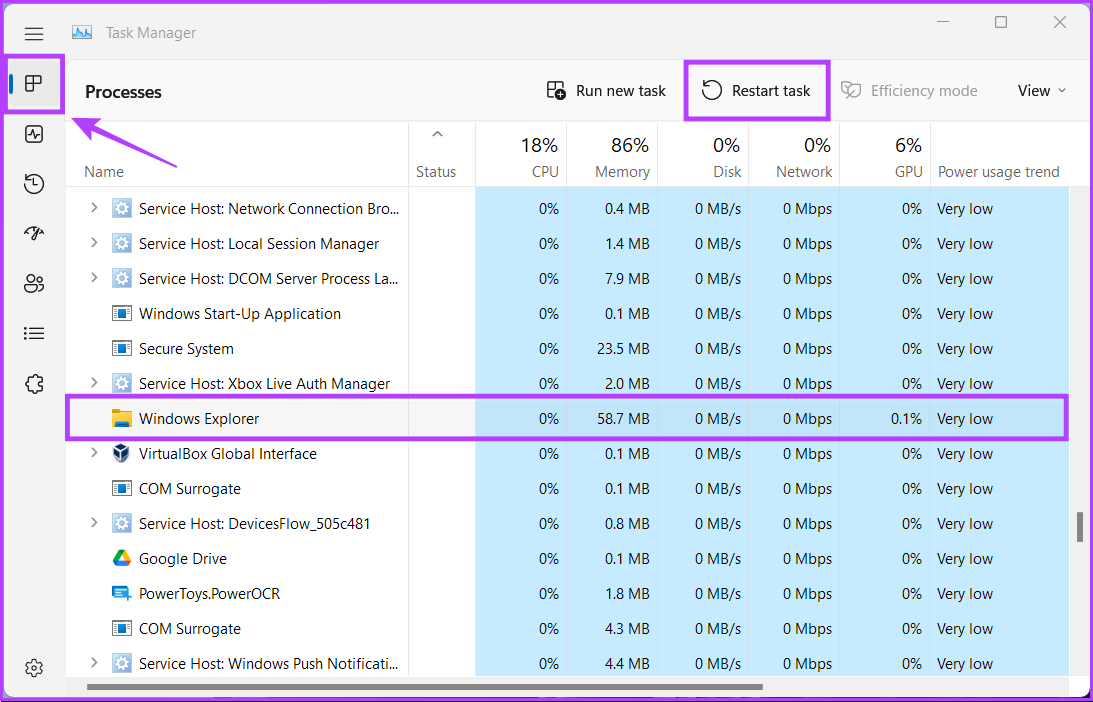
Windows Explorer (previously, File Explorer) can lead to several issues whenever it fails to function normally, and you may experience glitches such as disappearing taskbar icons, the preview pane not working, and so on. Thankfully, you can quickly fix such issues by restarting the Windows Explorer. Follow the steps below: Step 1: Press the Windows + X keys to open the Power User menu and select Task Manager. Step 2: In the Task Manager window that appears, head to the Processes tab and select the Windows Explorer process. Then, click on the ‘Restart task’ button at the top. If you see more than one process related to Windows Explorer, select the one with more memory usage. After you restart the Windows Explorer, the Alt+Tab shortcut will function normally. If that doesn’t work, move to the next solution.
4. Update or Reinstall the Keyboard Drivers
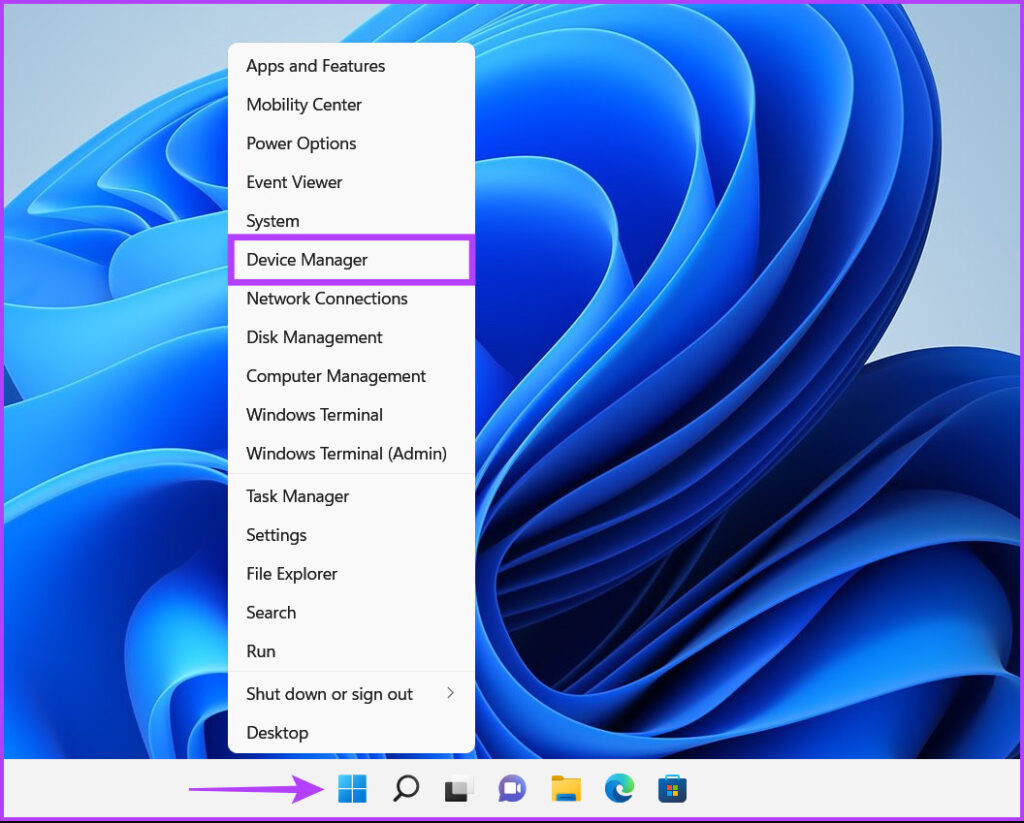
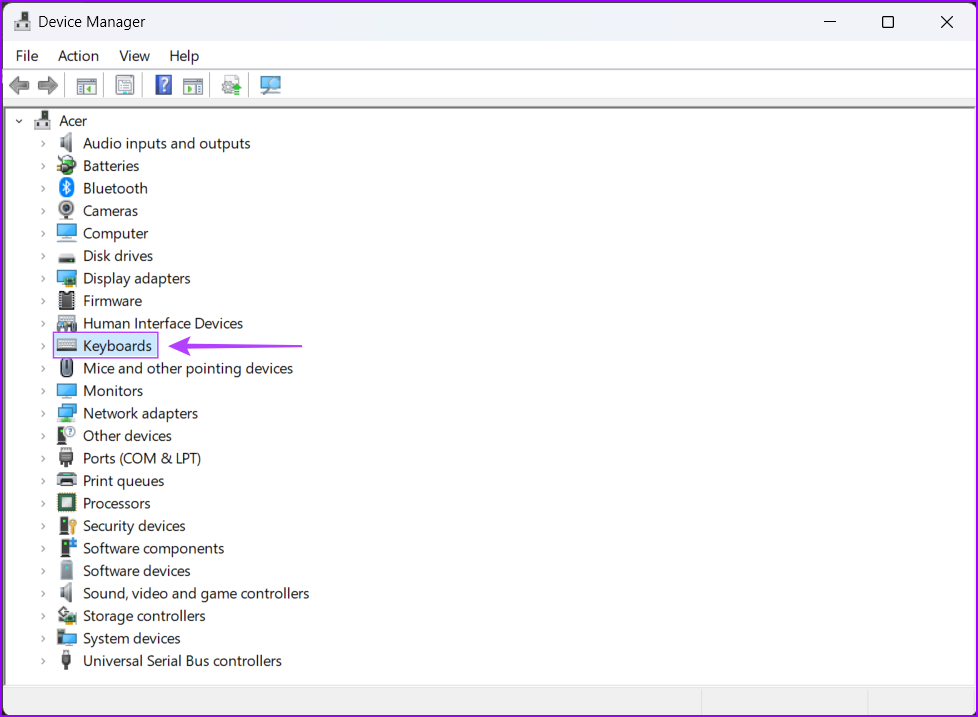
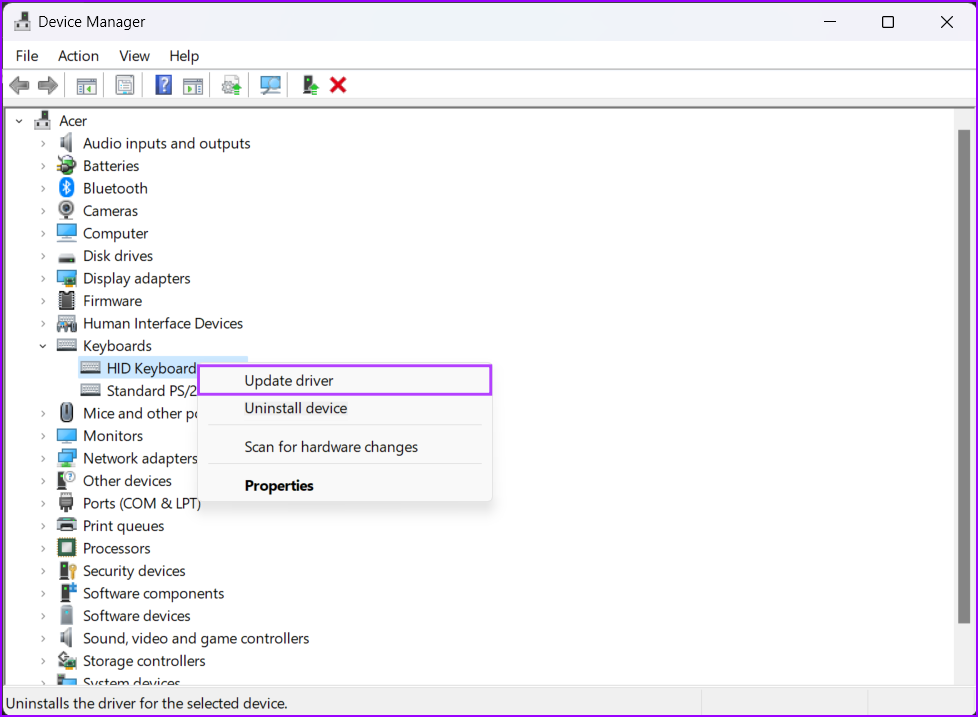
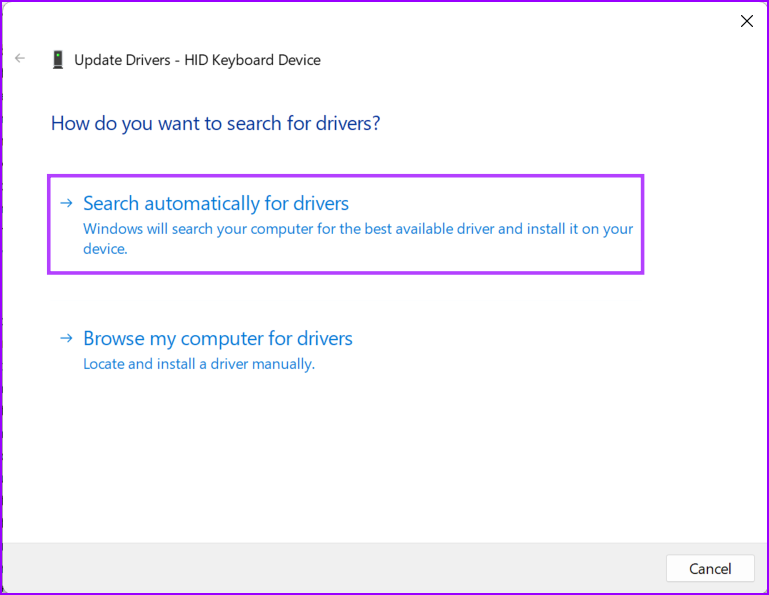
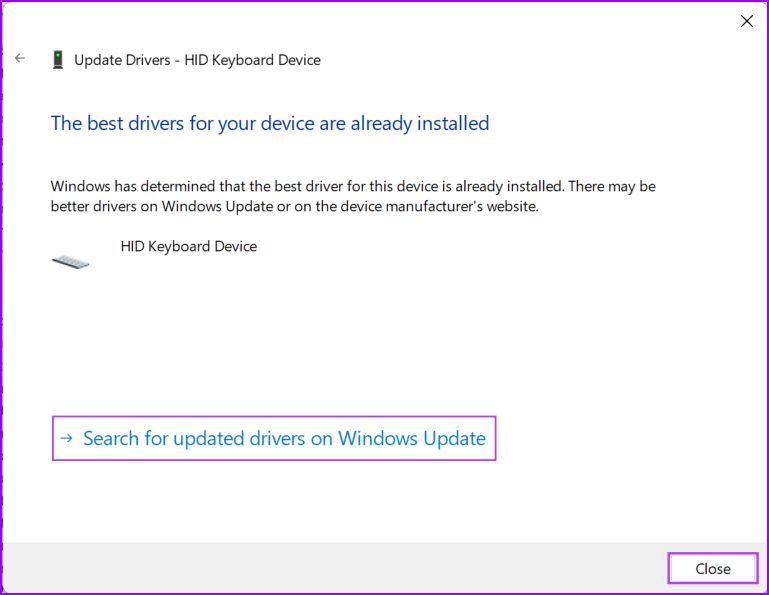
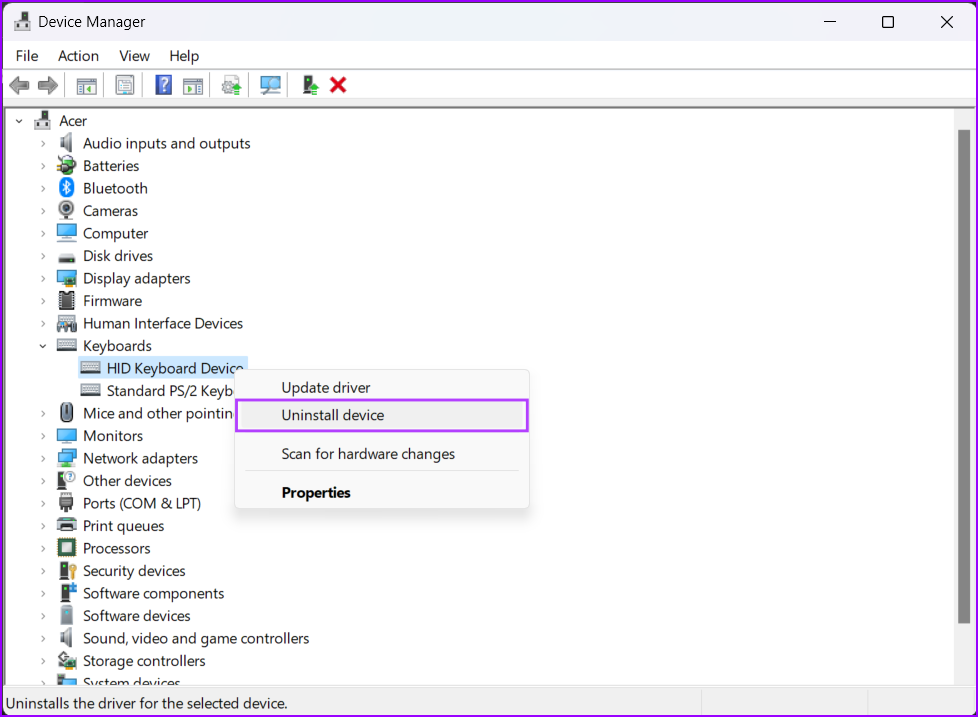
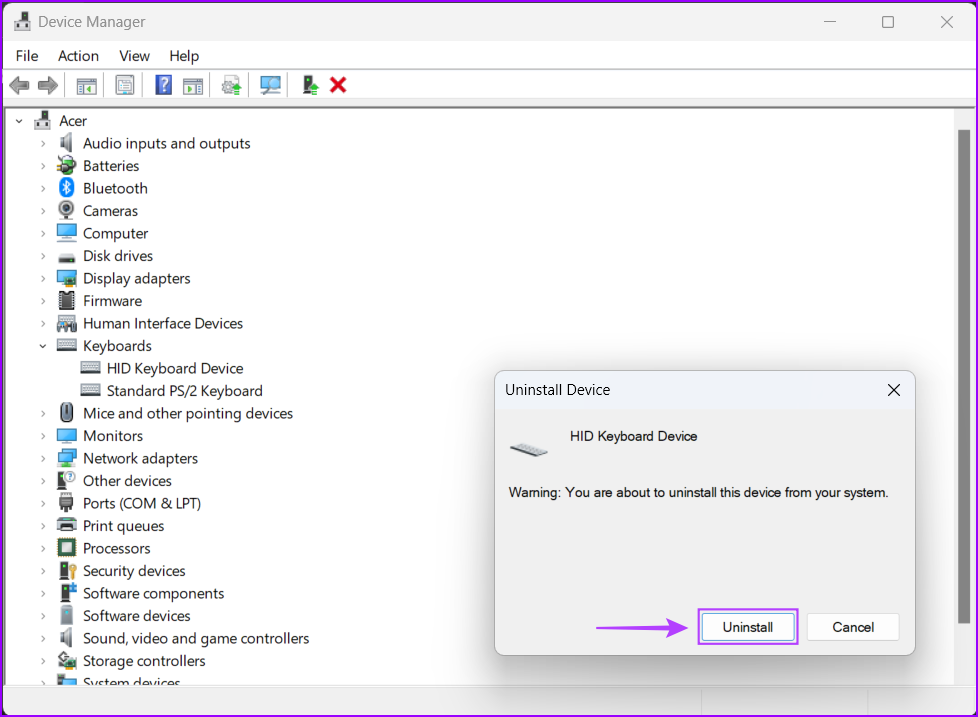
Windows 11 is susceptible to hardware-related issues due to unstable or outdated drivers. Such outdated or corrupt drivers can cause the keyboard to malfunction. So it’s a good idea to update or reinstall the keyboard drivers on your computer, especially if you’ve upgraded from Windows 10 to Windows 11. Here’s how you can easily update or reinstall the keyboard drivers on your computer to fix issues with the Alt+Tab shortcut not working. Step 1: Right-click on the Start button and select Device Manager from the list. Step 2: In the Device Manager window, look for the ‘Keyboards’ entry and double-click to expand it. Step 3: Under Human Interface Devices, right-click on ‘HID Keyboard Device’ and select ‘Update Driver.’ Step 4: On the Update Drivers window, click on ‘Search automatically for drivers.’ Step 5: Let it search for latest drivers verified by Microsoft for your keyboard. It will find and install the latest drivers, if available. Otherwise, click on the Close button in the bottom-right corner. When you see a message stating that your computer has the best drivers installed, you may ask the app to search for new drivers through the Windows Update. After that, you should check the keyboard manufacturer’s website for the latest drivers. Step 6: If you aren’t able to find any new drivers for the keyboard, right-click on ‘HID Keyboard Device’ and select ‘Uninstall device.’ Step 7: On the confirmation dialog that appears, click on Uninstall. Step 8: Restart your PC. After you restart your PC, Windows 11 will automatically search for the relevant keyboard drivers and install them.
5. Enable Peek at Desktop
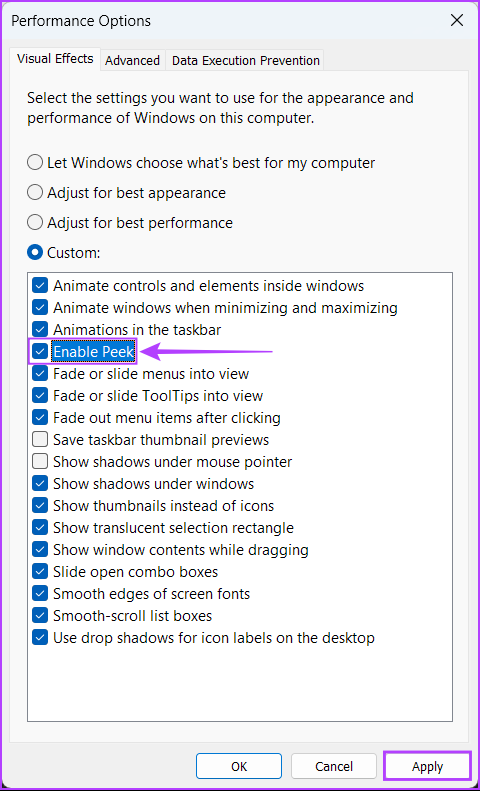
The Peek feature in Windows lets you hover on the right-hand corner of the Taskbar or use the Ctrl + , (Comma) shortcut to peek at the desktop. Further, the Alt+Tab shortcut also relies on Peek to work properly. If the peek feature is not enabled on your PC, the Alt+Tab shortcut might not work as expected. Follow the steps below to enable it: Step 1: Press the Windows + R keys to open the Run tool and type sysdm.cpl. Then press Enter. Step 2: In the System Properties dialog, select the Advanced tab. Then click on Settings button under Performance section. Step 3: When a Performance Options dialog box appears, click on the Enable Peek check box if it isn’t already enabled. Then click Apply. After you enable Peek, you can use the Alt+Tab shortcut as before.
6. Check if Windows Hotkeys Are Enabled
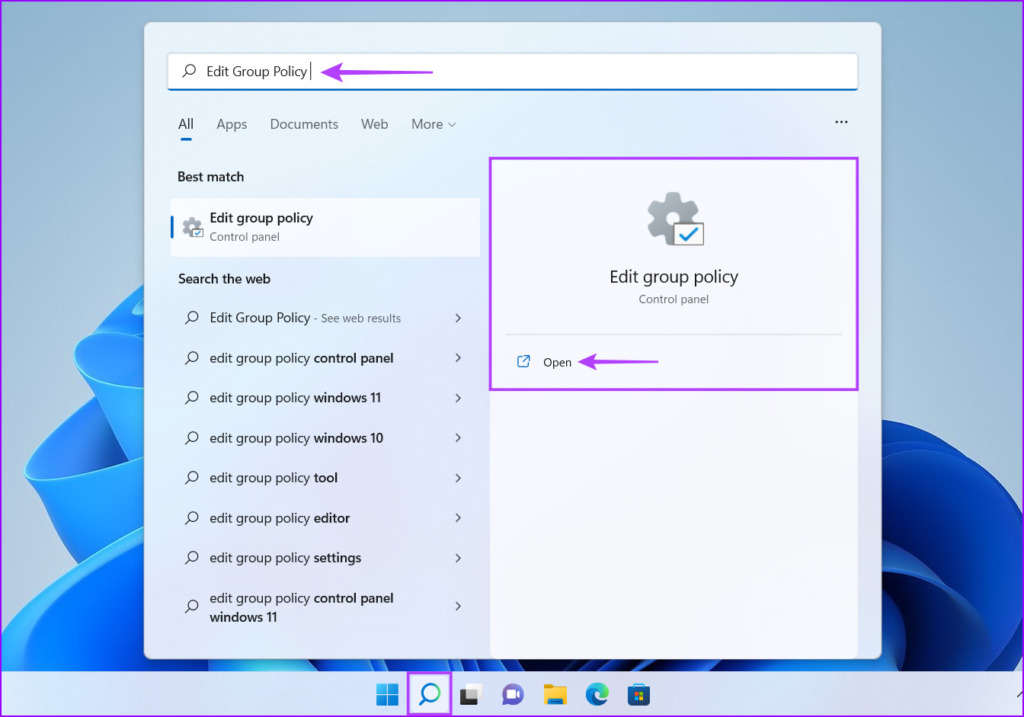
Windows Hotkeys are essentially certain key combination such as Alt+Tab, Windows + R, Windows + I, etc., built into Windows that allows users to access common shell features. However, these shortcuts can stop working if Windows Hotkeys are disabled on your computer. This solution won’t work for Windows 11 Home edition users as they can’t access the Group Policy Editor. Here’s how you can check if Windows Hotkeys are enabled on your Windows 11 computer: Step 1: Press the magnifying glass to access Search and type Edit group policy. From the search result that appears, click on Open. Step 2: Inside the Local Group Policy Editor, navigate to the following path: Step 3: Under the File Explorer folder, look for a policy called ‘Turn off Windows Key hotkeys’ and double-click on it. Step 4: In the ‘Turn off Windows Key hotkeys’ dialog box window that opens, check whether the policy is not enabled and is to Not Configured or Disabled. If this policy is Enabled, you will need to click on Not Configured, followed by Apply. Then restart your PC and check if it fixes the Alt+Tab shortcut for you.
7. Check for Windows Update
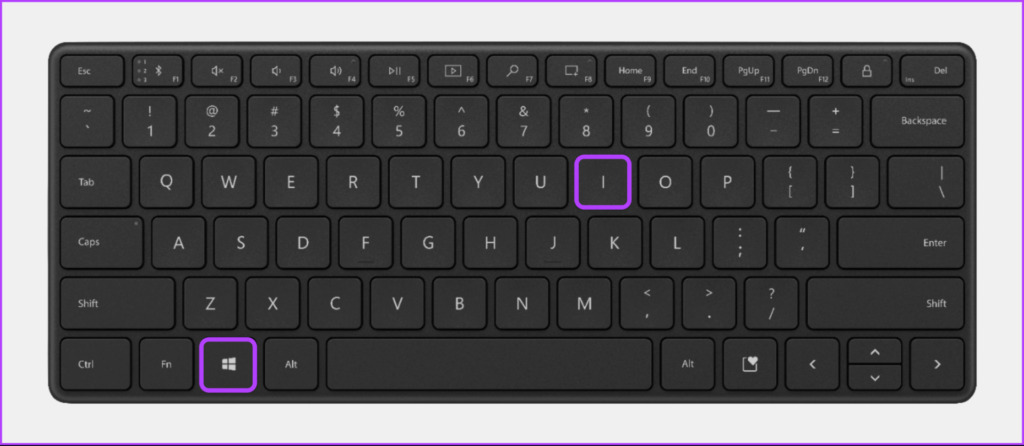
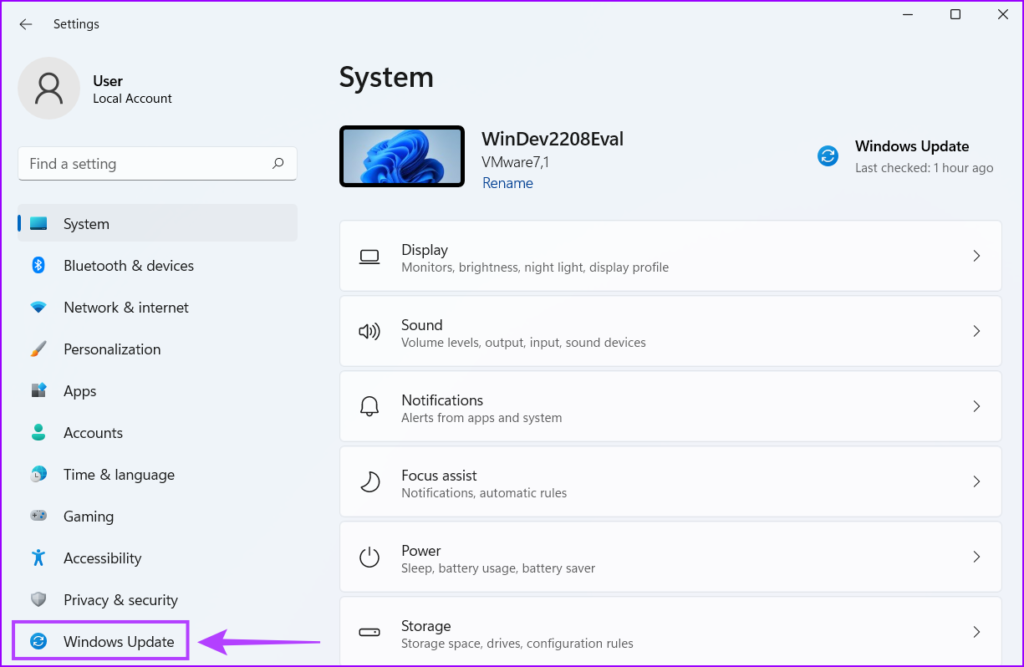
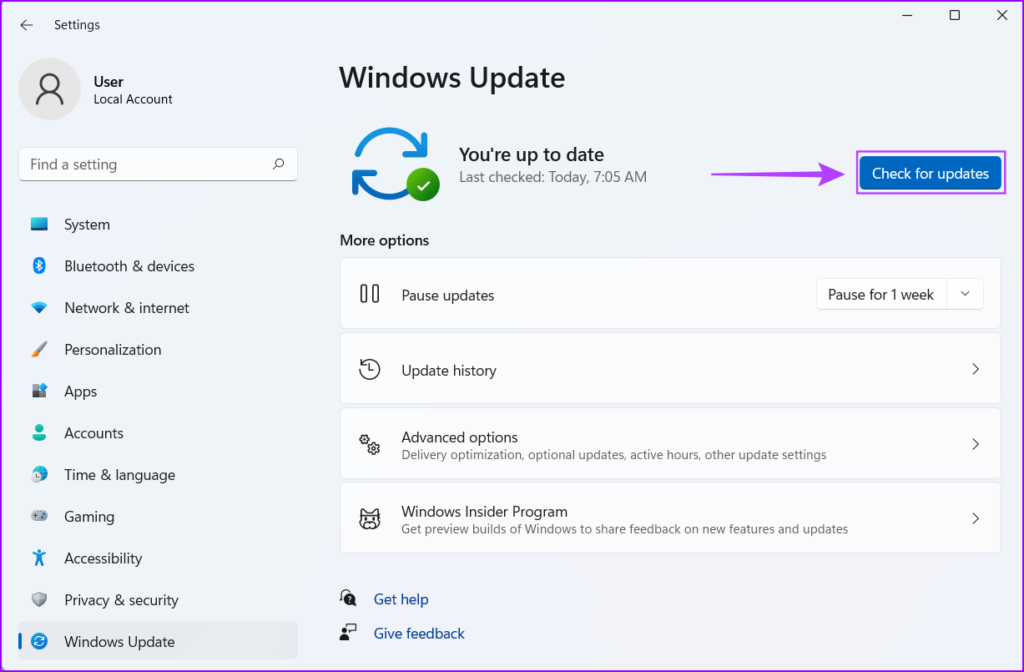
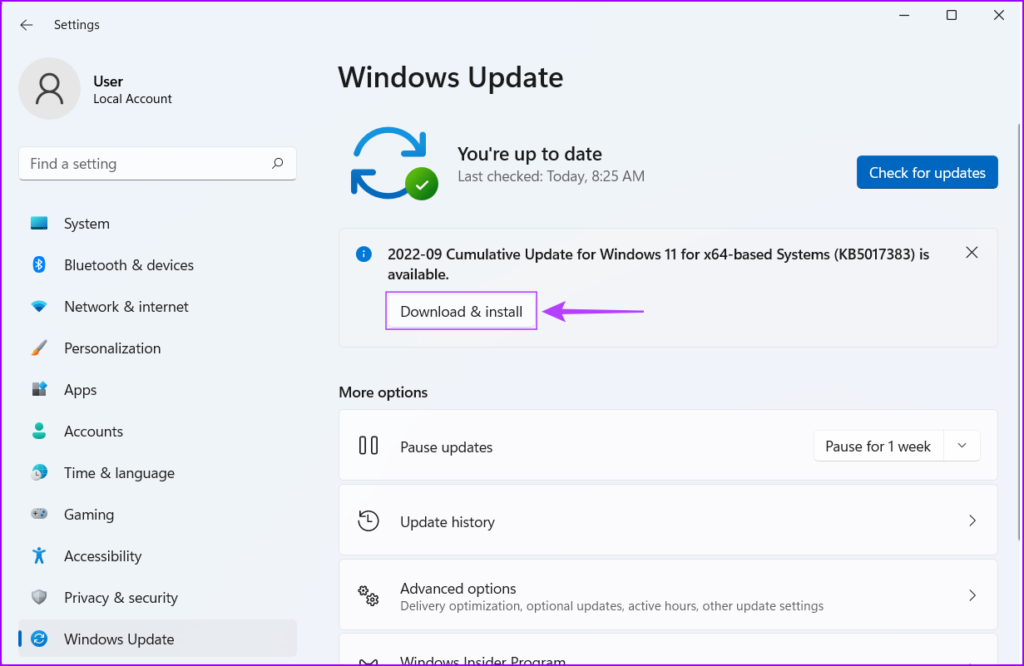
While this seems trivial, you can fix one of the best ways to fix almost all issues you might be facing on your Windows computer with a simple software update. Updating to the latest version of Windows ensures that you have the latest bug fixes and security updates available to improve your system’s performance and stability. Here’s how you can check for Windows updates on your Windows 11 PC: Step 1: Press the Windows + I keys together to open the Settings app. Step 3: In the Settings window, select Windows Update from the left sidebar. Step 4: Click the ‘Check for updates’ button. If a new Windows Update is available, install it and check if it fixes the Alt+Tab shortcut for you.
8. Run an Antivirus Scan
Often hidden malware can lead to file corruption, breaking many crucial features on your system. Thankfully, you can get rid of such malware using the built-in Windows Security app or any third party app, such as Malwarebytes. Here’s how you can detect and get rid of malware using the Windows Security app on your Windows computer: Step 1: Press the Windows + S keys to access Search and type Windows Security. From the search result, click on Open under Windows Security. Step 2: Click on ‘Virus & threat protection’ option. Step 3: On the Virus & threat protection page, click on Quick Scan. If you find malware on your system, remove it and check if that fixed the Alt+Tab shortcut. If that doesn’t help, move on to the next solution, which can help you reverse and fix the corruption caused due to malware or other factors.
9. Run an SFC Scan
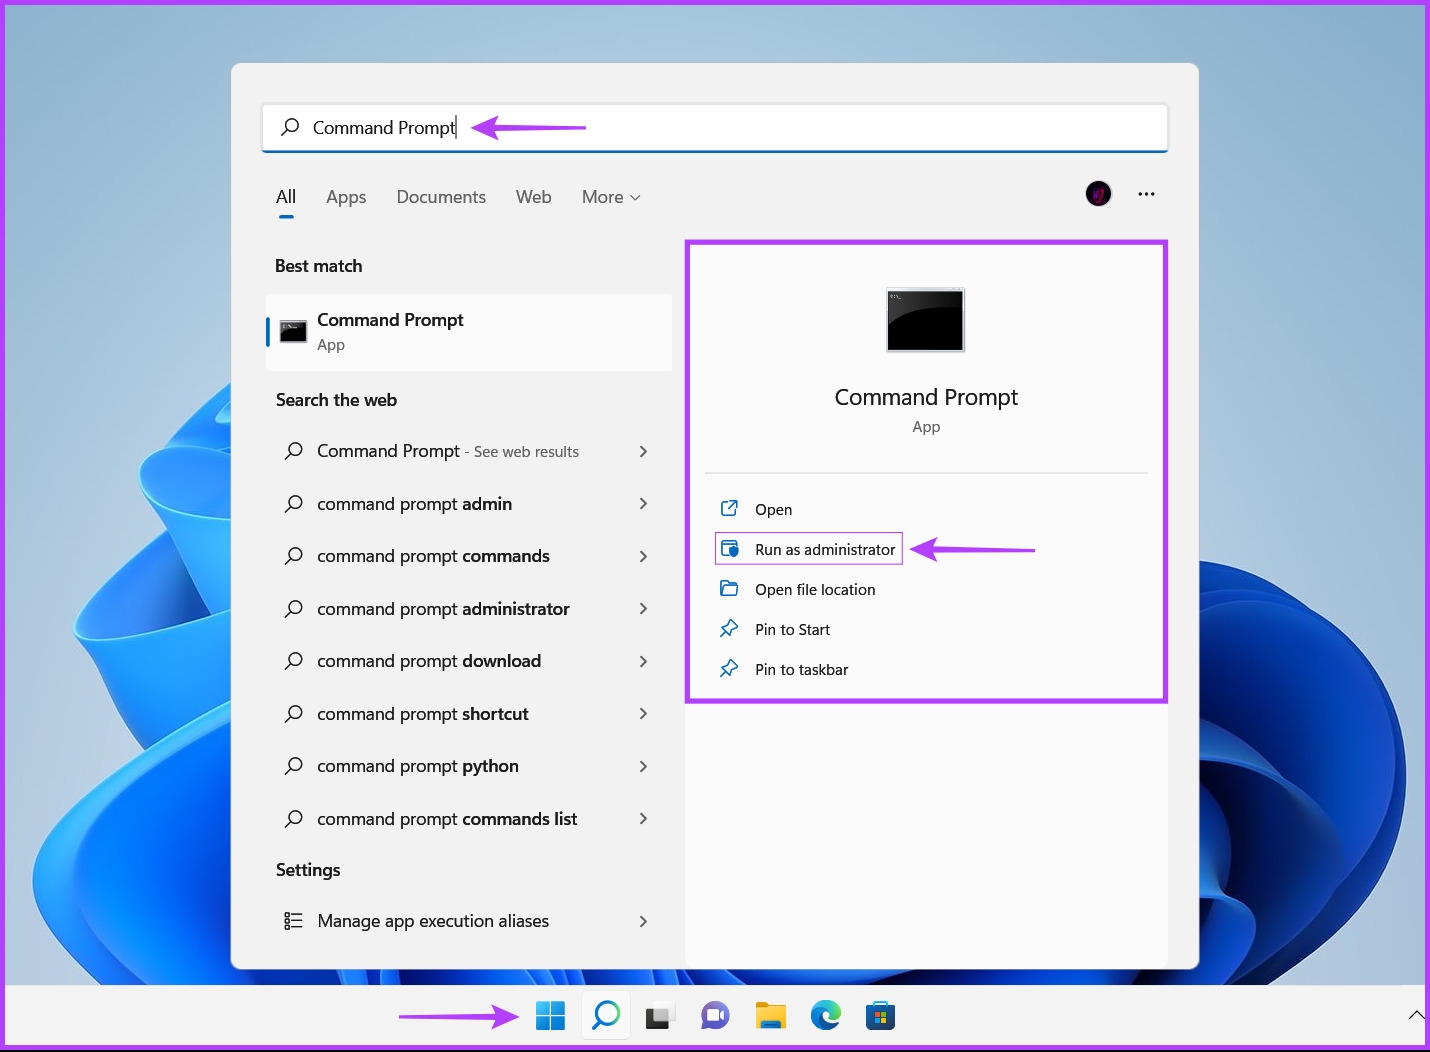
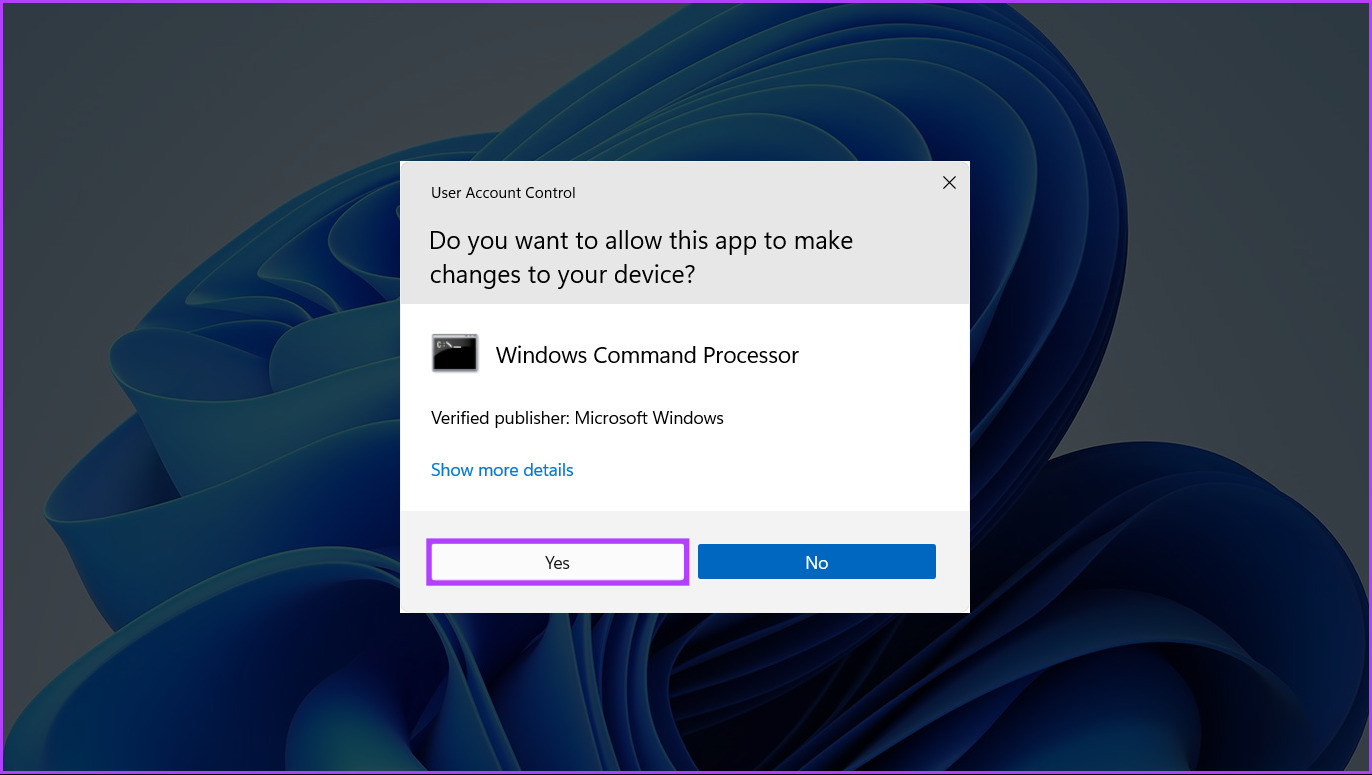
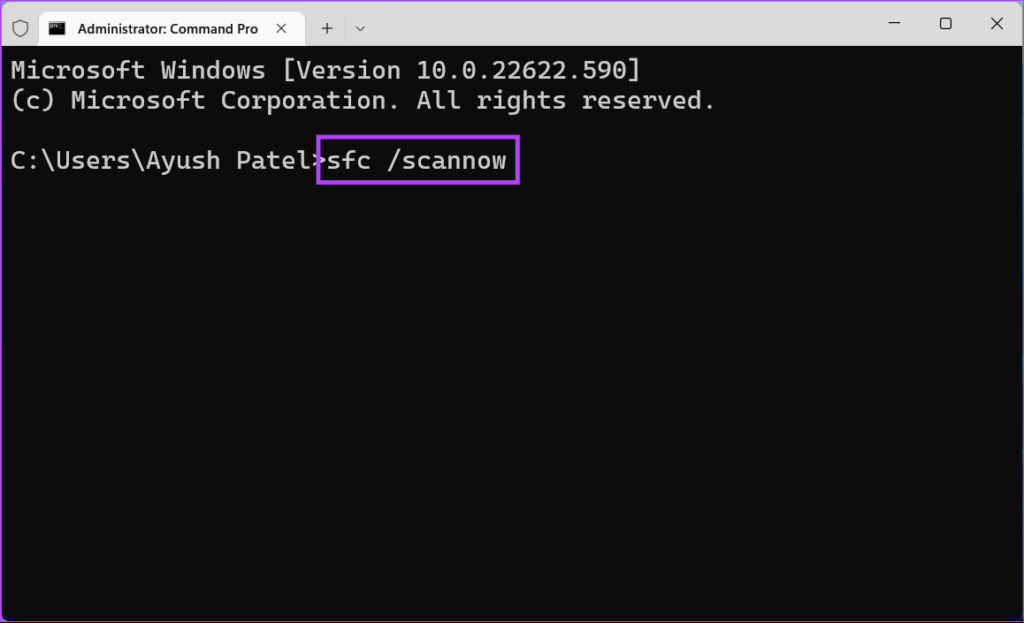
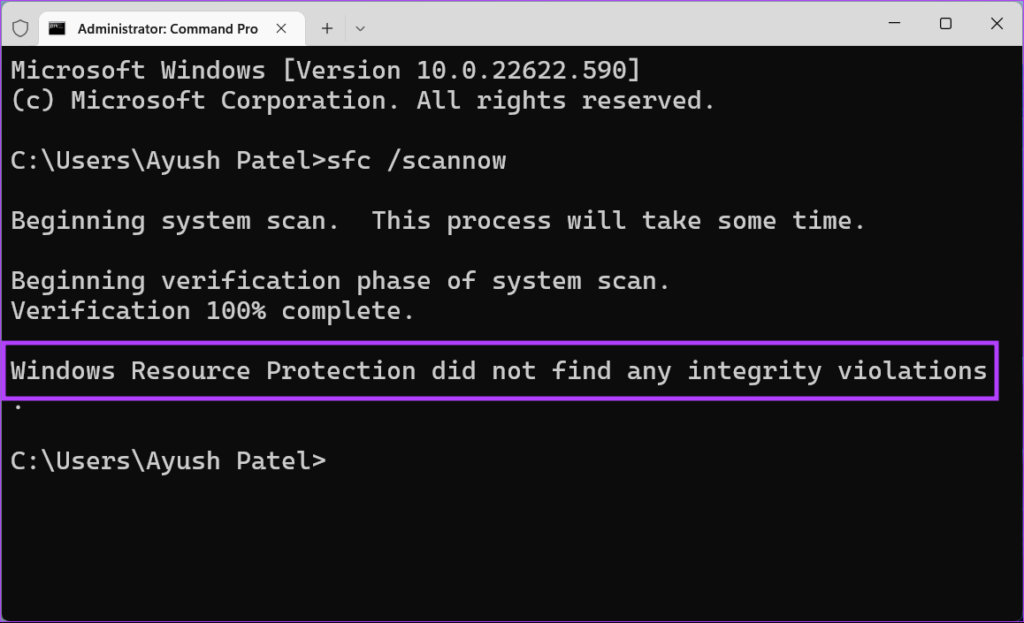
Whether it’s due to a dying hard drive or malware lurking on your system, corrupted configuration files can lead to several unfavorable issues on Windows. If you think that’s the case with your system, you can quickly run an SFC (System File Checker) scan to detect and fix the corrupt files, as detailed in the steps below: Step 1: Press the Windows + S keys and type Command Prompt. From the results for Command Prompt, click on ‘Run as administrator.’ Step 2: Click on Yes when a User Account Control (UAC) prompt appears on the screen. Step 3: Type the following command into the Command Prompt window and press Enter: After the scan completes, you’ll see a message stating whether or not it found any problems. If the SFC scan didn’t find any issues, you’ll see a message that says, ‘Windows Resource Protection did not find any integrity violations.’ However, if you discover issues relating to corrupted configuration files, it will automatically repair them.
10. Switch to the Legacy Alt+Tab Viewer
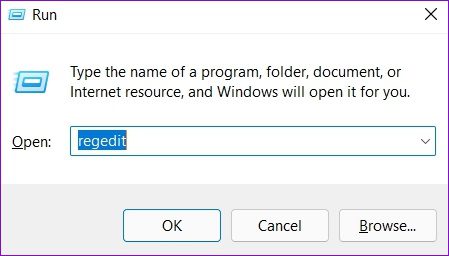
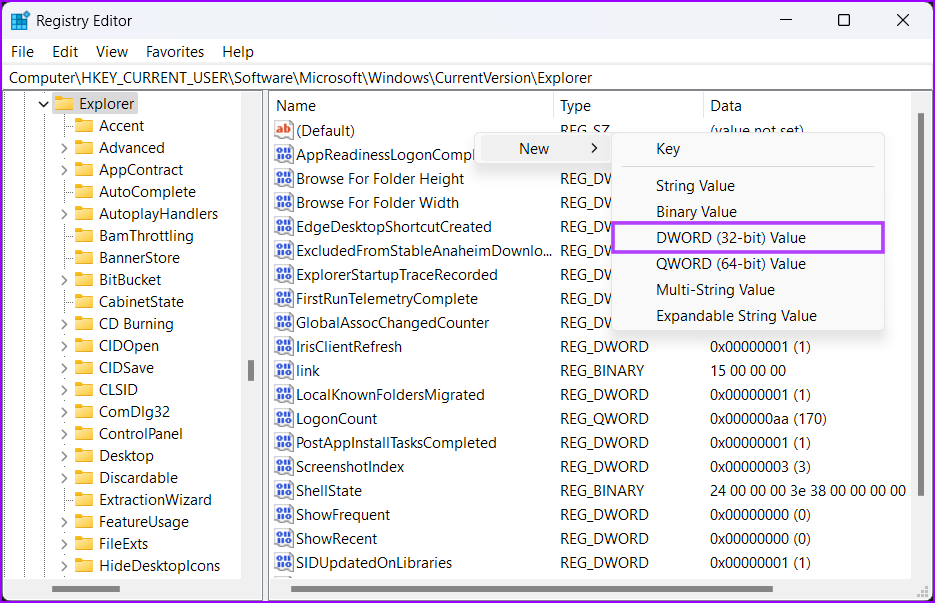
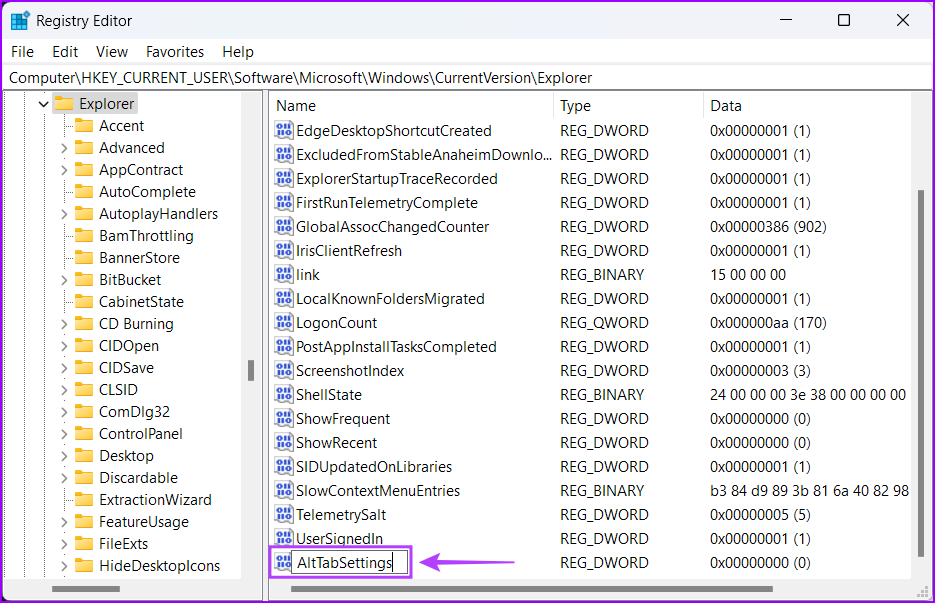
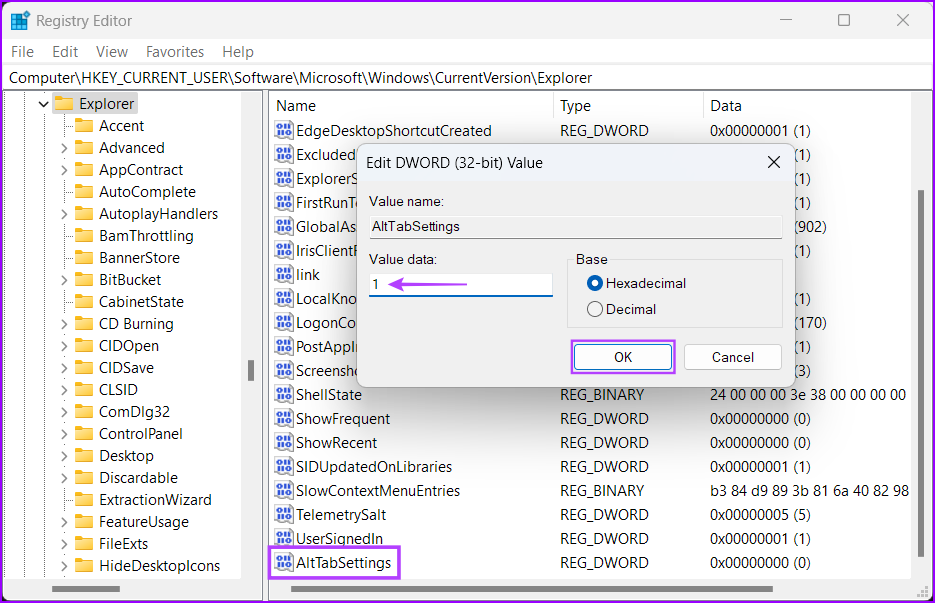
If none of the methods work , the last thing you can do is switch to the legacy or classic Alt+Tab viewer on your Windows 11 computer. Here’s how you can switch to the legacy Alt+Tab viewer using the Registry Editor on your Windows 11 PC: Step 1: Press the Windows key + R keys to open the Run dialog and type regedit in the text field. Then, press Enter. Step 2: Copy and paste the following location into the Navigation bar: Step 3: Right-click anywhere in the right pane and select the option that says ‘DWORD (32-bit) Value.’ Step 4: Type AltTabSettings and press Enter to create the DWORD (32-bit) Value. Step 5: Double-click the newly created AltTabSettings entry and set its Value data to 1. Then, click on OK to save the changes. Restart your computer to apply the registry changes and check if pressing the Alt+Tab shortcut opens the app switcher.
Get Alt+Tab Up and Running
After following the fixes mentioned above, you will get the Alt+Tab shortcut up and running to instantly switch between app windows on your Windows 11 computer. Let us know which solution worked for you, or if you found another way to get the Alt+Tab shortcut to work.
