If the usual tricks such as restarting your PC or the app haven’t helped, you can work your way through the solutions below to fix the on-screen keyboard on Windows 11.
1. Enable On-Screen Keyboard
One of the basic problems arises when you’ve disabled the on-screen keyboard or some update or app caused it. If the on-screen keyboard fails to open on Windows 11, try enabling it from the Settings app. Read on to learn how. Step 1: Right-click on the Start menu icon and select Settings from the list. Alternatively, you can also press the Windows key + I to achieve the same.
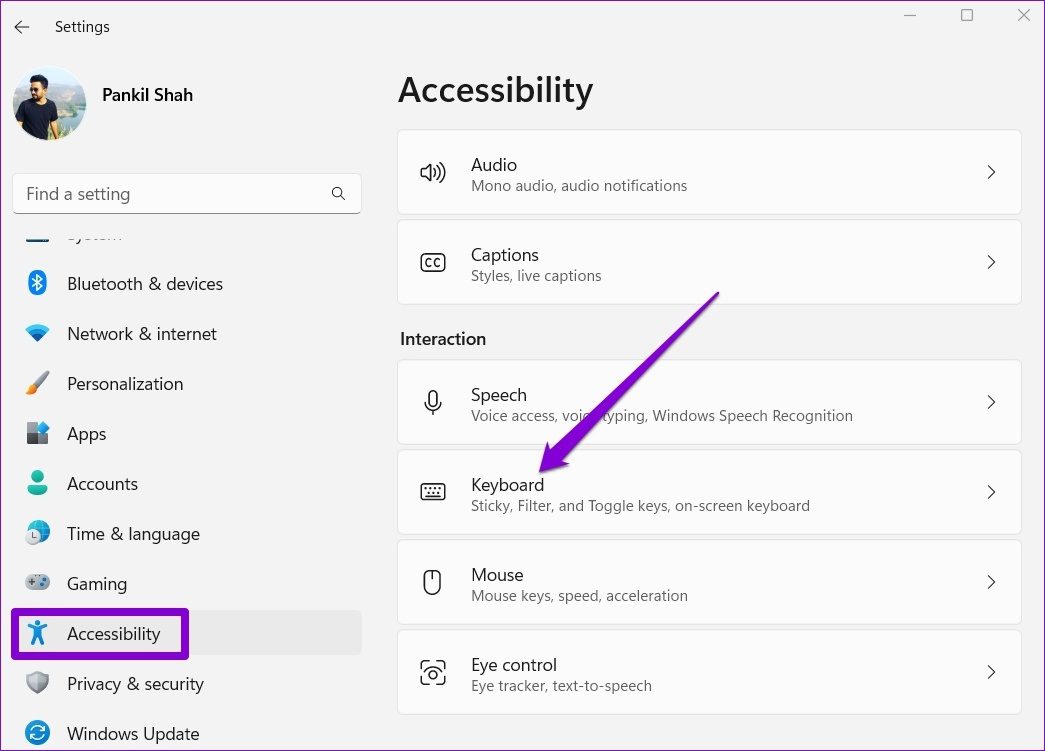
Step 2: Selec Accessibility tab from the left column. On the right-pane, scroll down to the Interaction section and click on Keyboard.
Step 3: Toggle on the switch next to the On-screen keyboard and it should appear right away.
2. Try Alternative Methods to Open On-Screen Keyboard
There is more than one way to launch the on-screen keyboard app on Windows. Press the Windows key + R to launch the Run command, type in osk.exe, and press Enter. But that can get tedious. Another way to launch the on-screen keyboard is by creating a desktop shortcut. Step 1: Right-click anywhere on the empty space on the Desktop, go to New, and select Shortcut from the sub-menu.
Step 2: Type in %windir%\System32\osk.exe in the location box and hit Next.
Step 3: Enter a suitable name for the shortcut and hit Finish.
Double-click on the newly created shortcut to see if you can open the on-screen keyboard.
3. Check if Touch Keyboard and Handwriting Panel Service Is Running
Touch Keyboard and Handwriting Panel Service is an essential component that needs to run in the background for the on-screen keyboard app to work. You can go through the list of Windows Services to ensure that Touch Keyboard and Handwriting Panel Service is running. Here’s how. Step 1: Press the Windows key + R to open the Run dialog box. Type in services.msc and press Enter.
Step 2: In the following window, you’ll find all the services on your PC arranged in alphabetical order. Check if the ‘Touch Keyboard and Handwriting Panel Service’ is running. If not, then right-click on it and select Start to run it.
4. Run an SFC Scan
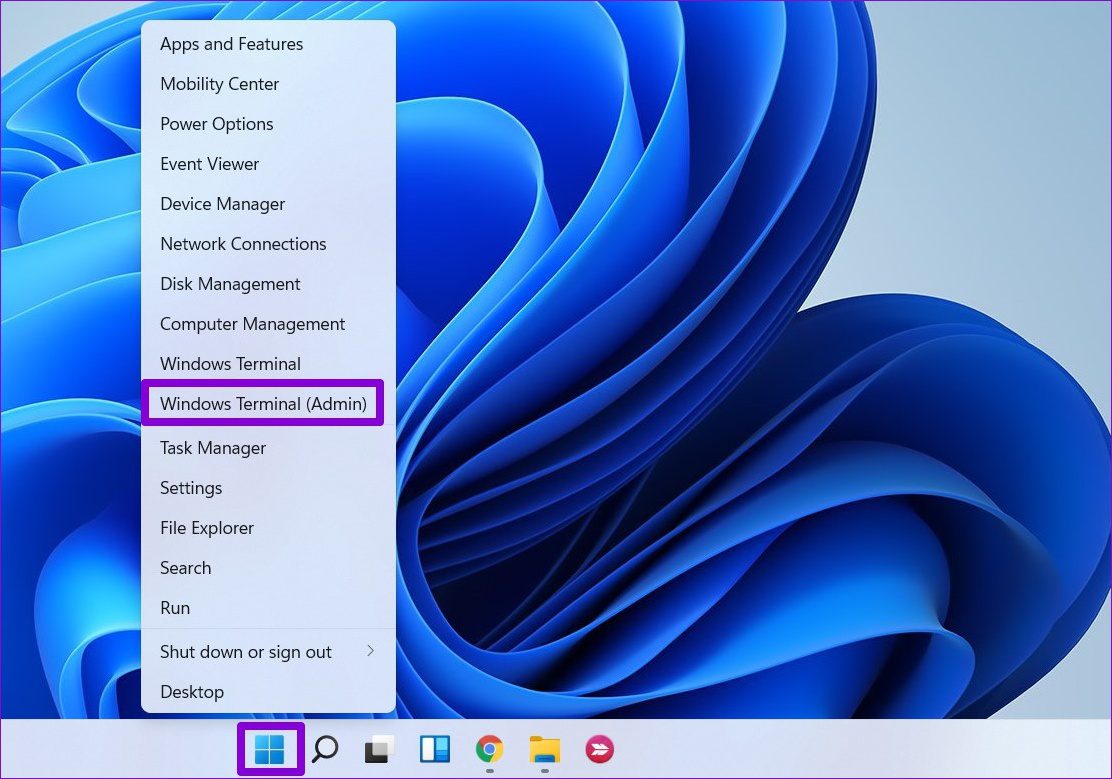
It’s possible that the on-screen keyboard not working issue is occurring due to corrupted system files on your PC. If that’s the case, you’ll need to run an SFC (System File Checker) scan on your PC to repair those files. Step 1: Right-click on the Start menu icon and select the Windows Terminal (Admin) option from the list.
Step 2: Type the command mentioned below and press Enter.
SFC scan will start verifying the integrity of all the system files on your PC. After the scan completes, a message will appear conveying if the scan was successful.
5. Tweak Registry Editor
Windows Registry will also let ensure On-screen Keyboard works as expected. However, this means you’ll need administrative rights and consider backing up your registry files before executing the steps given below. Step 1: Press the Windows key + R to launch the Run command, type in regedit, and press Enter.
Step 2: Use the address bar up top to navigate to the following key:
Step 3: On your right, you’ll see a MonitorSize key. Double click on it and change its value data to 22.5 and hit OK.
Restart your PC for changes to take place and this should fix the on-screen keyboard not working issue.
6. Update Windows 11
If you’ve been delaying Windows updates for a while, it’s about time you install them. Several features and glitches get fixed with the improvements and under the hood changes brought by the Windows updates. Press the Windows key + I to launch the Settings app. Use the left pane to navigate to the Windows Update section and install any pending updates from there. Then check to see if you can use the on-screen keyboard.
Start Tapping
An on-screen keyboard can be more than useful if you’re having trouble with your physical keyboard. Occasionally, the on-screen keyboard can be finicky, just like any other app on Windows but it’s nothing you can’t fix yourself.


